I've been wanting to update my guest bathroom for awhile now. Especially the cabinets and faucet. The faucet was so close to the edge of the sink you had to rub against the back of the sink to get any water!
I had been cruising Pinterest and the web for alternate cabinet solutions that I could afford.
I was inspired by the idea from this website: http://timmonsfamilylemonade.blogspot.com/2010/09/cupboard-makeover-phase-1.html
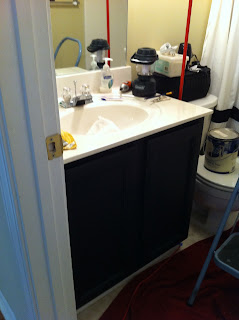
Here are some before pictures:
Don't you love the 90's orange glow wood?
 Here is the old faucet:
 Here are the old "Hollywood Lights":

I didn't want to remove the cabinets or sand them (lazy, I know!) so I used 2 coats of primer prior to painting the cabinet black. I also primed the medicine cabinet that was that same orangey wood color.


While primer was drying I attacked the old light fixture. Guess what was underneath? A lovely hole in the sheet rock. Of course the base of my new light fixture is round and won't cover this so back to the Lowe's for a patch kit. Some man made that hole and then covered it up!
 Here is my after the patch picture. I did really well didn't I??
 I also added a new switch to turn on the light fixture since I had a dimmer switch and my new fixture is not compatible with one. I sure am brave working with all this electricity!
Here is the finished patch and new light fixture.

Next I started the coats of color on my primed cabinets. I did 2 coats of Valspar's "Kettle Black" in satin. After they thoroughly dried, I touched up any places I missed. Here they are in progress:


 Here is a glimpse inside the cabinet (I decided to leave this unpainted). Look at that edge. I'm good!

In between coats, I tackled the faucet.
I'm in love with that push to plug drain AND we can actually wash our hands under this faucet!


I worked on storage for towels next. There was a chrome towel bar on the wall across from the toilet but it wasn't working for me so I surfed the web and Pinterest for a cute storage solution.
I found an idea for using baskets on the wall to store towels. I loved the idea! I got my baskets at Target in the storage section and used drywall screws with small washers around the head to hold the basket tighter to the wall. The wall paint in this photo looks yellow but it is really a beige color.


I found this great decal at JoAnn's and I thought it'd look great above the door.
It looks great with this room!

More reveal photos in a while!
Here are some before pictures:
Don't you love the 90's orange glow wood?


I didn't want to remove the cabinets or sand them (lazy, I know!) so I used 2 coats of primer prior to painting the cabinet black. I also primed the medicine cabinet that was that same orangey wood color.


While primer was drying I attacked the old light fixture. Guess what was underneath? A lovely hole in the sheet rock. Of course the base of my new light fixture is round and won't cover this so back to the Lowe's for a patch kit. Some man made that hole and then covered it up!


Here is the finished patch and new light fixture.

Next I started the coats of color on my primed cabinets. I did 2 coats of Valspar's "Kettle Black" in satin. After they thoroughly dried, I touched up any places I missed. Here they are in progress:


In between coats, I tackled the faucet.


I worked on storage for towels next. There was a chrome towel bar on the wall across from the toilet but it wasn't working for me so I surfed the web and Pinterest for a cute storage solution.
I found an idea for using baskets on the wall to store towels. I loved the idea! I got my baskets at Target in the storage section and used drywall screws with small washers around the head to hold the basket tighter to the wall. The wall paint in this photo looks yellow but it is really a beige color.


I found this great decal at JoAnn's and I thought it'd look great above the door.
It looks great with this room!

More reveal photos in a while!
Comments